CPS-VO events are postings in the calendar. Events have important details such as a Title, a start date, a location. It may also have a description and a URL. Events also have "Audiences". Audiences are CPS-VO groups and you may be a member to any number of them. If no audience is marked for an event or it is marked public then it will only show in the global calendar for all CPS-VO users. If you have selected groups in the audience section, the event will show on the selected group calendars and activity stream pages.
To post events in the calendar follow the instructions outlined in steps 1 and 2 below.
STEP 1:
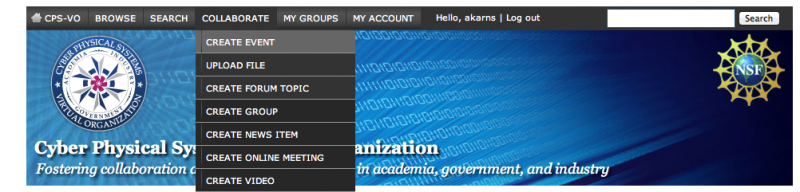 |
Go to the "Create Event" form by clicking on the link in the "Collaborate" dropdown menu at the top of the CPS-VO home page. |
 |
You can also "Create Event" from within a group by using the "Collaborate" toggle menu in the left sidebar area of a group page. |
STEP 2: Before submitting the event details it is suggested that you fill out as much information as possible about your posting. Required items are marked with a *red star. (Details below):
 |
|
 |
|
 |
|
 |
|
Use the advanced options to select specific months and days to repeat on.
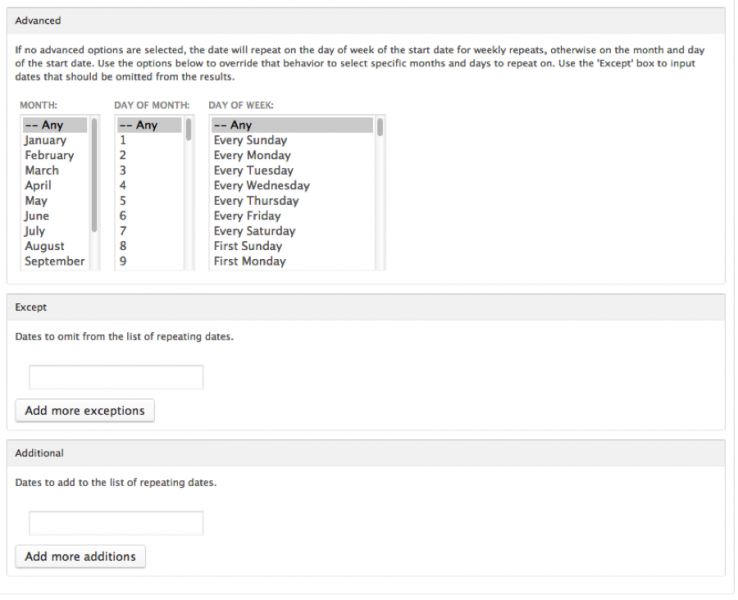 |
Use the 'Except' box to input dates that should be omitted from the results. Use the ‘Additional’ box to insert extra dates which fall outside of the repetition pattern. Click the “Add more” buttons beneath exceptions and additions for multiple entries. |

|
Add a slideshow image if you want your event to be added to a group spotlight slideshow. Click the "Browse" button to navigate to the image on your computer then click the "Upload" button to submit the image. It should show as a thumbnail if successfully uploaded.
The dimensions of the image should be 320x230 pixels. Leave 47 pixels at the bottom for the slide title. Also leave 45 pixels on each side (making a 230 pixel square "sweet spot"). This will allow for the image to be cropped nicely in the set of icons beneath the spotlight. |
 |
A set of options near the bottom of the page allow you to set notifications, event details, groups, publishing options, authoring information and URL path settings:
|
 |
|
 |
|
|
|

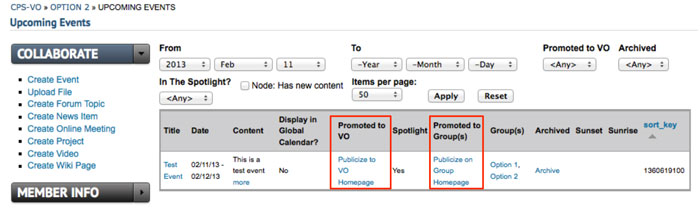
Promote and publish news items to the group home page in the "events" section and/or spotlight slideshow.

About Publishing Options
- Publish: Uncheck this option if you don't wish for this content to appear on the VO yet. Useful for saving drafts of content that requires editing before going live/published.
- Publicize to Entire VO: Selecting this option will place this post on the VO homepage. Exercise caution when using this option.
- Publicize on Group Homepage: This option will place your post on your group's homepage in the corresponding section (Recent News, Upcoming Events, etc…)
- Archive: Clicking the archive checkbox hides this content from global and group home pages. However, the content will still be accessible in other areas of the site. Unchecking the archive checkbox allows this content to display on global and group home pages.
- Sunrise: Setting a sunrise date will de-archive this content at the set date and time (midnight is the default if a time is not set). The content will then display on global and group home pages.
- Sunset: Setting a sunset date will automatically archive this content at the set date and time (midnight is the default if a time is not set). The content will no longer display on global and group home pages after the sunset date/time, but will still be accessible in other areas of the site.
- Display in Slideshow: Will place this post, along with its image (or video), in a slideshow. Must be used with eitherPublicize to Entire VO or Publicize on Group Homepage options.
- Pin to Top of Lists: This option will make this post appear at the top of content listings, regardless of any other settings. Useful for denoting important content or content that has a "call to action" associated with it.